
GitHub Actions Tutorial: Basic Concepts and a CI/CD Pipeline That Builds and Pushes a Docker Image
Quick answer
GitHub Actions is GitHub's built-in platform for automating developer workflows, and a CI/CD pipeline is just one of those workflows. You describe a workflow in a YAML file under .github/workflows: events (like a push or pull request) trigger jobs, each job runs on a fresh runner machine, and each job is a list of steps that either run shell commands or reuse ready-made actions. With actions like docker/login-action and docker/build-push-action, plus credentials stored as repository secrets, you can build an app and push its Docker image to Docker Hub in a few lines.
Video chapters (10)
- 0:00 Intro
- 1:03 What is GitHub Actions?
- 1:29 What are developer workflows? Use cases for GitHub Actions
- 4:50 Basic concepts: GitHub events and actions
- 6:41 GitHub Actions CI/CD
- 7:18 Why another CI/CD tool? Benefits of GitHub Actions
- 9:50 Demo: create a CI workflow
- 13:04 Syntax of the workflow file
- 20:40 Where does the workflow run? GitHub Actions runners
- 24:35 Build a Docker image and push to a private Docker repo
Key takeaways
- GitHub Actions automates any developer workflow triggered by repository events, not only CI/CD.
- Workflows live as YAML files in .github/workflows and are versioned with your code.
- Events trigger jobs; jobs contain steps; a step either uses an action or runs a command.
- Every job runs on its own fresh runner (ubuntu-latest, windows-latest or macos-latest), and jobs run in parallel unless you add needs.
- A matrix strategy runs the same job across several operating systems or language versions at once.
- Store registry credentials as encrypted secrets and reference them with ${{ secrets.NAME }}, never in plain text.
- docker/login-action@v3 and docker/build-push-action@v6 build and push an image to Docker Hub or GHCR.
In this GitHub Actions tutorial I explain what GitHub Actions actually is, the core concepts behind it (events, workflows, jobs, steps, actions and runners), and then we build a complete CI pipeline together: a Java Gradle application that gets tested on several operating systems, built into a Docker image and pushed to a private Docker Hub repository. It’s for developers and DevOps beginners who want to understand the concepts first and then have a working, copyable workflow file.
What is GitHub Actions?
GitHub Actions is a platform to automate developer workflows, built directly into GitHub. A lot of tutorials present it as a CI/CD tool, but CI/CD is just one of many workflows you can automate with it: every time something happens in or to your repository, GitHub Actions can run automated tasks in response.
To see why that matters, think about what developers spend time on besides writing code. Let’s say you maintain an open source Java library that makes working with dates and times easier. You have users and contributors, and they keep the repository busy:
- A user finds a bug in the latest release and opens an issue. You have to triage it: is it minor or urgent, did others report it, can you reproduce it, who should fix it?
- A contributor fixes it and opens a pull request. You review the code, check the issue is gone, and merge it into the main branch.
- Now you want a new release: run a pipeline that tests and builds the artifact, write release notes, and bump the version number.
All of these are workflows, and the bigger the project gets, the more organizational effort they take. You want to automate as much as possible so you can focus on building features. That is exactly what GitHub Actions was created for.
How GitHub Actions works: events, workflows, jobs, steps and actions
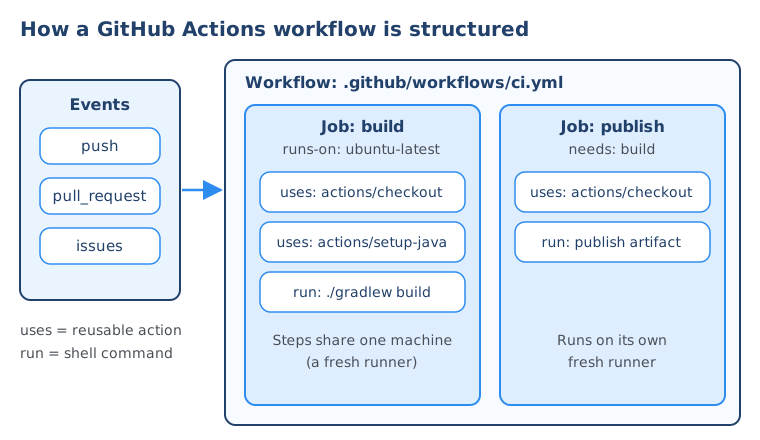
GitHub Actions works by listening to events in your repository and running a workflow in response. A workflow is made of one or more jobs, each job is a list of steps, and each step either runs a command or uses a reusable action.
Here is what each term means:
- Event: something that happens in or to your repository. Someone pushes a commit, opens a pull request, creates an issue, or joins as a contributor. Tools you integrated with GitHub can produce events too, and you can also trigger workflows on a schedule or manually.
- Workflow: the automated process you want to run when an event happens, defined in a YAML file in
.github/workflows/. Because it lives in the repository, it’s versioned and reviewed like the rest of your code. - Job: a group of steps that runs together on one machine.
- Step: one small task, for example “check out the code”, “label this issue” or “run the tests”.
- Action: a reusable, packaged step that someone already wrote, like checking out code or installing Java. Each small automated task, such as writing a comment or adding a label, can be an action, and a chain of actions makes up your workflow.
- Runner: the server that actually executes a job.
So for the issue example: the event is “an issue was opened”, and the workflow might label it, assign it, and run a script that tries to reproduce the bug and comments the result.
Why use GitHub Actions for CI/CD?
The main reason to use GitHub Actions for CI/CD is that your pipeline lives right next to your code: no separate CI server to install, secure and maintain, and ready-made environments and integrations instead of plugins you configure by hand.
For a private application, CI/CD is the first workflow you’ll think of: commit, test, build an artifact, push it to a registry, deploy. So why another CI/CD tool?
- It’s integrated. If your code is already on GitHub, you don’t need a separate third-party tool with its own users, permissions and maintenance.
- It’s easy to set up. It’s designed for developers, so a development team can set up and maintain its own pipeline without a dedicated DevOps person just for the CI server.
- Tool integrations are simple. This is the big one. One project is a Node.js app pushed to Nexus and deployed on DigitalOcean; another is a Java Maven app tested on Linux and Windows, pushed to Amazon ECR and deployed on EKS. In a classic CI server you’d install and configure tools and plugins for every combination. In GitHub Actions you just say “I need an environment with Node and Docker in this version” and use existing actions for the registry and deployment parts.
Here is how it compares with Jenkins, the tool many teams use today:
| GitHub Actions | Jenkins | |
|---|---|---|
| Hosting | Managed by GitHub (or your own self-hosted runners) | You install and run the Jenkins server |
| Pipeline definition | YAML workflow files in .github/workflows/ | Jenkinsfile written in Groovy |
| Tool setup | Preinstalled runner images plus setup actions (e.g. actions/setup-java) | Install tools and plugins on the server or agents |
| Reusable building blocks | Actions from the GitHub Marketplace | Jenkins plugins and shared libraries |
| Triggers | Any GitHub event: push, pull request, issue, release, schedule, manual | Webhooks, polling, schedules, manual |
| Best fit | Code hosted on GitHub, teams that want low maintenance | Full control, complex or on-premises setups |
How to create a GitHub Actions workflow
To create a workflow, add a YAML file under .github/workflows/ in your repository, either by hand or by picking one of the starter templates on the repository’s Actions tab.
In the demo I created a repository called my-project, pushed a simple Java Gradle application and opened the Actions tab. GitHub suggests a big list of workflow templates, grouped roughly into:
- Deployment workflows, to deploy to cloud services or with automation tools.
- Continuous integration workflows for many languages and tool combinations, for example Java with Gradle, Java with Maven, Node.js, Python, plus workflows that publish artifacts to package registries.
- Automation workflows, the repository chores I mentioned earlier, such as greeting first-time contributors or labeling issues and pull requests.
I picked the Java with Gradle template. GitHub creates the file at .github/workflows/<name>.yml; the file name is up to you, so I called it ci.yml. Then I committed it on a new branch and opened a pull request against the main branch.
Here is the workflow, updated to current versions:
name: Java CI with Gradle

on:
  push:
    branches: [ "main" ]
  pull_request:
    branches: [ "main" ]

jobs:
  build:
    runs-on: ubuntu-latest

    steps:
      - name: Check out the code
        uses: actions/checkout@v4

      - name: Set up JDK 17
        uses: actions/setup-java@v4
        with:
          java-version: "17"
          distribution: "temurin"

      - name: Make the Gradle wrapper executable
        run: chmod +x gradlew

      - name: Build with Gradle
        run: ./gradlew build
In the video the template used actions/checkout@v2, actions/setup-java@v1 with java-version: 1.8, and the master branch. Today use actions/checkout@v4 and actions/setup-java@v4, which requires a distribution such as temurin, and a supported Java version like 17 or 21. New repositories also default to main instead of master, so match whatever your default branch is called.
GitHub Actions workflow syntax explained
A workflow file has three main parts: a name, the on section that lists the triggering events, and the jobs section that defines what runs. Let’s go through each part of the file above.
name
name describes what the workflow does. It’s shown in the Actions tab, so make it meaningful.
on: the events that trigger the workflow
The on section defines which events start the workflow. Here it’s every push to main and every pull request that targets main. That makes sense for CI: whenever something is merged into main, or someone wants to merge into main, you want the tests to run so you know the change is mergeable and doesn’t break anything. You can trigger workflows on many other events too, such as issues, release, schedule or workflow_dispatch for a manual run button; GitHub’s “Events that trigger workflows” documentation lists them all.
jobs: what runs
Under jobs you define one or more jobs. The key (build) is a name you choose. A job groups the steps that get executed when the events happen.
steps with uses: reusing actions
The first step is logical: before you can build or test anything, you need the code on the machine. Since basically every pipeline needs this, GitHub provides an official checkout action instead of letting everyone write it themselves.
uses: actions/checkout@v4 means: use the action from the checkout repository in the actions organization on GitHub, at version v4. An action is just a normal repository with an action.yml file describing its logic and inputs. Its README documents the parameters you can pass with with. The part after @ is the version, because actions are released and versioned like any other project. You can use any action this way: official ones under github.com/actions, ones from the GitHub Marketplace, or ones your own team created.
The second step, actions/setup-java, prepares the environment with the Java version you define. This is the part I mentioned earlier: in Jenkins you’d go and configure the JDK installation yourself; here you simply declare “give me an environment with Java 17”.
steps with run: shell commands
Whenever you run a command instead of an action, you use run. Here chmod +x gradlew makes the Gradle wrapper executable, and ./gradlew build compiles and tests the app. All steps of a job run in the same environment, so the code is checked out, Java is installed, and then Gradle builds in that same place. For this to work, your project of course needs to be a Java application built with Gradle.
Watching the run
As soon as I opened the pull request, the workflow started, because the event matched what just happened. In the run details you see every step: Set up job (prepares the environment and downloads the actions), the checkout, the JDK setup, the Gradle build with “BUILD SUCCESSFUL”, and some post steps that GitHub adds automatically to clean up. The logs highlight each executed command, so it’s easy to see how your steps were interpreted. For an initial setup, I find it straightforward and hard to mess up.
Free download
Not sure what to learn after GitHub Actions?
A CI/CD pipeline connects many DevOps skills: Git, build tools, Docker, container registries, Kubernetes and cloud deployments. The roadmap shows you in which order to learn them.
Where do GitHub Actions workflows run? Runners explained
GitHub Actions workflows run on runners: servers managed by GitHub that come ready to execute your jobs, so you don’t set up build servers, install tools or configure plugins yourself.
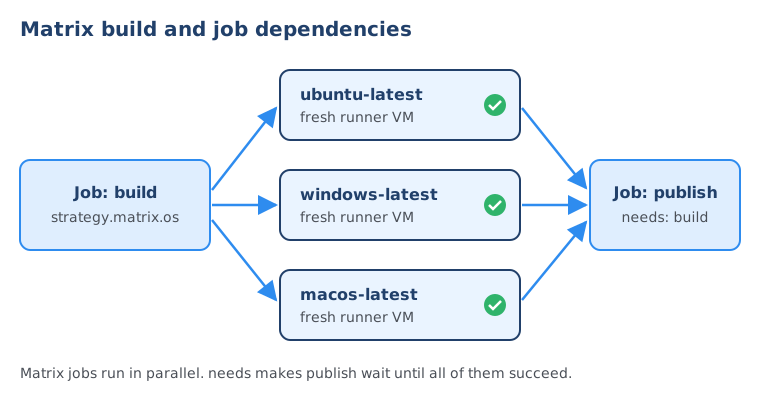
An important detail: every job runs on a fresh runner. If your workflow has a build job and a publish job, each one gets its own new machine. By default jobs run in parallel. That’s often not what you want: you’d only publish the artifact after the build succeeded. You override the default with needs:
jobs:
  build:
    runs-on: ubuntu-latest
    steps:
      - uses: actions/checkout@v4
      - run: ./gradlew build

  publish:
    needs: build          # wait for the build job to succeed first
    runs-on: ubuntu-latest
    steps:
      - uses: actions/checkout@v4
      - run: echo "publish the artifact here"
The runs-on line picks the runner. GitHub-hosted runners come with Ubuntu, Windows or macOS, referenced with labels like ubuntu-latest, windows-latest and macos-latest. If you need special hardware, private network access or your own software, you can also register self-hosted runners on your own machines.
Matrix builds: test on several operating systems at once
A matrix build runs the same job several times with different values, for example on every operating system or several Java versions, all in parallel. Say you ship your application to customers on all three operating systems; you want to test every commit to main on each of them:
jobs:
  build:
    strategy:
      matrix:
        os: [ubuntu-latest, windows-latest, macos-latest]
    runs-on: ${{ matrix.os }}

    steps:
      - uses: actions/checkout@v4
      - uses: actions/setup-java@v4
        with:
          java-version: "17"
          distribution: "temurin"
      - name: Build with Gradle
        run: ./gradlew build
strategy.matrix.os defines the list, and runs-on: ${{ matrix.os }} references the current value. After merging the pull request, I edited the workflow on main and committed. The Actions tab then showed three builds running in parallel, one per operating system. You can combine dimensions too, for example java: ["17", "21"] gives you 3 × 2 = 6 jobs.
GitHub Actions Docker build and push to Docker Hub
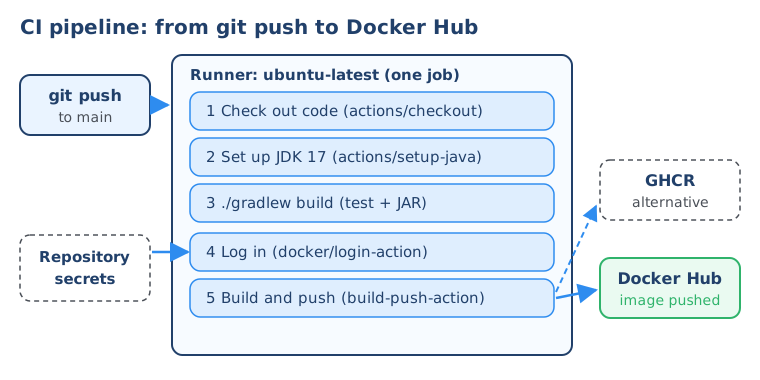
To build and push a Docker image with GitHub Actions, you log in to the registry with docker/login-action, then build and push with docker/build-push-action, passing your credentials from repository secrets. Because we live in a world of containers, a JAR file alone won’t do it, so this is the next step in our pipeline.
I have a private repository on Docker Hub, and that’s where the Java demo image will go. You also need a Dockerfile in the project root. A minimal one for the Gradle JAR could look like this (adjust the JAR path to your build output; if Gradle produces more than one JAR, copy the exact file name):
FROM eclipse-temurin:17-jre
WORKDIR /app
COPY build/libs/*.jar app.jar
EXPOSE 8080
ENTRYPOINT ["java", "-jar", "app.jar"]
Commands or an action?
You have two options for a step like this. You could write the commands yourself with run and YAML’s multi-line pipe syntax, because Docker is preinstalled on the Ubuntu runners:
      - name: Build and push with plain Docker commands
        run: |
          echo "${{ secrets.DOCKERHUB_TOKEN }}" | docker login -u "${{ secrets.DOCKERHUB_USERNAME }}" --password-stdin
          docker build -t yourdockerid/my-project:latest .
          docker push yourdockerid/my-project:latest
But building and pushing an image is something almost every project does, so you can expect actions for it to exist. If you search the GitHub Marketplace, you find them, along with usage examples and a description of every input. That’s the more convenient option: the action does the login, build, tag and push in the background, and you only pass parameters such as the registry, image name and credentials.
In the video I used a community action (version 4 at the time) with inputs for the registry, image and credentials. Today I recommend Docker’s official actions, docker/login-action@v3 and docker/build-push-action@v6: they’re maintained by Docker, use BuildKit, and support caching and multi-platform builds.
Store credentials as GitHub secrets
GitHub needs to authenticate with your private registry. The workflow file is part of your code, so you must never put credentials in it as plain text. Instead, create secrets in GitHub:
- Open your repository’s Settings → Secrets and variables → Actions.
- Click New repository secret and add
DOCKERHUB_USERNAMEwith your Docker Hub username. - Add
DOCKERHUB_TOKENwith a Docker Hub access token (create one in your Docker Hub account settings).
In the video I stored my Docker Hub password. Today use an access token instead: you can limit its permissions and revoke it without changing your password. In the workflow you reference secrets with ${{ secrets.NAME }}, the same expression syntax you saw with matrix.os.
The complete CI workflow
For the Docker part we don’t need all three operating systems, so I went back to ubuntu-latest, which is also the runner type with Docker ready to use. Here’s the final .github/workflows/ci.yml:
name: CI - build and push Docker image

on:
  push:
    branches: [ "main" ]
  pull_request:
    branches: [ "main" ]

env:
  IMAGE_NAME: yourdockerid/my-project   # your Docker Hub ID / repository name

jobs:
  build:
    runs-on: ubuntu-latest

    steps:
      - name: Check out the code
        uses: actions/checkout@v4

      - name: Set up JDK 17
        uses: actions/setup-java@v4
        with:
          java-version: "17"
          distribution: "temurin"

      - name: Build with Gradle
        run: |
          chmod +x gradlew
          ./gradlew build

      - name: Set up Docker Buildx
        uses: docker/setup-buildx-action@v3

      - name: Log in to Docker Hub
        if: github.event_name == 'push'
        uses: docker/login-action@v3
        with:
          username: ${{ secrets.DOCKERHUB_USERNAME }}
          password: ${{ secrets.DOCKERHUB_TOKEN }}

      - name: Build and push Docker image
        uses: docker/build-push-action@v6
        with:
          context: .
          push: ${{ github.event_name == 'push' }}
          tags: |
            ${{ env.IMAGE_NAME }}:latest
            ${{ env.IMAGE_NAME }}:${{ github.sha }}
A few details worth knowing:
IMAGE_NAMEis your Docker Hub ID plus the repository name, exactly as shown on Docker Hub. It isn’t secret, so a plainenvvalue is fine.context: .means theDockerfileand build files are in the repository root, which is also the default location. Use thefileinput if your Dockerfile lives elsewhere.- I tag every image twice:
latestand the commit SHA, so you can always trace an image back to the exact commit. In the video the action generated a tag with the branch name as a prefix; withbuild-push-actionyou set tags explicitly, or generate them withdocker/metadata-action@v5. - The
ifandpush:expressions mean pull requests only build the image to prove it works, while pushes to main also publish it. Secrets aren’t passed to workflows from forked pull requests, so this also keeps outside pull requests from failing at the login step.
After committing this to main, the workflow ran and the new steps showed up in the run: build with Gradle, then build and push the Docker image. When I refreshed my Docker Hub repository, the new image tag was there. That’s a complete continuous integration workflow: we built the Java artifact, built a Docker image from it and pushed it to a private registry. In the DevOps Bootcamp you build pipelines like this end to end, all the way to deploying the image.
Alternative: push to GitHub Container Registry (GHCR)
If you’d rather keep images next to your code, you can push to GitHub Container Registry instead of Docker Hub. You don’t need to create any secret: the workflow’s built-in GITHUB_TOKEN can push, as long as you grant it packages: write:
jobs:
  build:
    runs-on: ubuntu-latest
    permissions:
      contents: read
      packages: write
    steps:
      - uses: actions/checkout@v4
      - uses: docker/setup-buildx-action@v3
      - uses: docker/login-action@v3
        with:
          registry: ghcr.io
          username: ${{ github.actor }}
          password: ${{ secrets.GITHUB_TOKEN }}
      - uses: docker/build-push-action@v6
        with:
          context: .
          push: true
          tags: ghcr.io/${{ github.repository }}:latest
GHCR image names must be lowercase, so if your user or repository name has capital letters, write the image name in lowercase instead of using github.repository.
Common GitHub Actions mistakes to avoid
Most first-time failures come from a few small things:
- Branch name mismatch. A trigger on
masternever fires in a repository whose default branch ismain. - Gradle wrapper not executable. “Permission denied” on
./gradlewmeans the file lost its executable bit;chmod +x gradlewin the workflow fixes it, or commit it executable withgit update-index --chmod=+x gradlew. - Assuming jobs share files. Each job runs on a fresh runner. To pass a build result to another job, upload it with
actions/upload-artifact@v4and download it withactions/download-artifact@v4, or simply build and package in the same job. - Unpinned or outdated actions. Always reference a version (
@v4), and update old major versions, since they stop working when GitHub retires the runtimes they depend on.
Summary
GitHub Actions automates developer workflows that react to repository events, and CI/CD is the most common one. You define a workflow in YAML under .github/workflows/: events trigger jobs, each job runs on a fresh runner, and steps either reuse actions with uses or run commands with run. With a matrix you test on several operating systems in parallel, and with secrets plus docker/login-action and docker/build-push-action you publish a Docker image to Docker Hub or GHCR. If you want to compare with a self-hosted CI server, read the Jenkins pipeline tutorial. For the deployment side, the Argo CD tutorial shows how to deploy images like this one to Kubernetes with GitOps, and Kubernetes services explained covers how the running app gets exposed.
Frequently asked questions
What is GitHub Actions used for?
GitHub Actions is used to automate developer workflows that react to events in a GitHub repository. The most common workflow is a CI/CD pipeline that tests, builds and deploys code on every push or pull request. It is also used for repository chores such as labeling issues, greeting new contributors, generating release notes and publishing packages.
Is GitHub Actions free?
GitHub Actions is free for public repositories on GitHub-hosted standard runners. Private repositories get a monthly allowance of included minutes and storage that depends on your GitHub plan, and usage beyond that is billed. Self-hosted runners use your own machines instead of GitHub's.
What is the difference between a job and a step in GitHub Actions?
A job is a group of steps that runs on one runner machine, and separate jobs run on separate machines, in parallel by default. A step is a single task inside a job, either a shell command defined with run or a reusable action referenced with uses. Steps in the same job share the same file system, so later steps can use what earlier steps built.
What is a runner in GitHub Actions?
A runner is the machine that executes a job. GitHub-hosted runners are fresh virtual machines with Ubuntu, Windows or macOS and many tools preinstalled, created for each job and discarded afterwards. You can also register self-hosted runners on your own servers when you need special hardware, network access or software.
How do I use secrets in GitHub Actions?
Go to your repository's Settings, then Secrets and variables, then Actions, and add a repository secret such as DOCKERHUB_TOKEN. In the workflow you reference it as ${{ secrets.DOCKERHUB_TOKEN }}, for example as an input to docker/login-action. GitHub masks secret values in the logs and does not pass them to workflows triggered from forks.
Is GitHub Actions better than Jenkins?
Neither is better in every case. GitHub Actions is built into GitHub, needs no server to maintain and gives you ready-made environments and a large marketplace of actions, so it is quicker to set up. Jenkins is self-hosted and extremely customizable, which suits teams that need full control or don't host code on GitHub.
How do I push a Docker image to Docker Hub with GitHub Actions?
Store your Docker Hub username and an access token as repository secrets. In your workflow, log in with docker/login-action@v3 using those secrets, then build and push the image with docker/build-push-action@v6 and push: true. Tag the image with your Docker Hub namespace and repository name, for example yourname/my-app:latest.