
What is Helm in Kubernetes? Helm and Helm Charts Explained for Beginners
Quick answer
Helm is the package manager for Kubernetes. It bundles all the YAML manifests an application needs (Deployments, Services, ConfigMaps, Secrets and so on) into a reusable, versioned package called a Helm chart, and it works as a templating engine: chart templates contain placeholders like {{ .Values.image.tag }} that Helm fills from a values.yaml file at install time. Helm also tracks every install and upgrade as a release, so you can upgrade, list and roll back deployments with single commands.
Video chapters (8)
Key takeaways
- Helm is the package manager for Kubernetes, comparable to apt, yum or Homebrew for operating systems.
- A Helm chart is a bundle of Kubernetes YAML templates plus metadata (Chart.yaml) and default configuration (values.yaml).
- Templates use placeholders like {{ .Values.replicaCount }}, filled from values.yaml, -f override files and --set flags.
- One chart can deploy many similar microservices or the same app to dev, staging and production with different values.
- Each helm install or helm upgrade creates a release revision, which makes helm rollback possible.
- Helm 3 removed the Tiller server from Helm 2 and stores release history as Secrets in the release's namespace.
- Use helm template to see the exact Kubernetes YAML a chart will produce before you deploy it.
In this guide I explain the main concepts of Helm: what Helm and Helm charts are, how the templating with values.yaml works, what a chart looks like inside, and which commands you use day to day. It is written for anyone who already knows basic Kubernetes objects like Deployments and Services and keeps running into Helm in tutorials, docs and real projects.
The video was recorded in the Helm 2 days. The concepts are exactly the same today, so I kept them, but every command and file in this guide is for Helm 3 and later, and I point out where things changed.
What is Helm in Kubernetes?
Helm is the package manager for Kubernetes. You can think of it like apt, yum or Homebrew, but for Kubernetes: a convenient way to package a collection of Kubernetes YAML files, share it through public or private repositories, and install it into a cluster with one command.
Helm has three main features, and the rest of this guide goes through each of them:
- Package manager: bundle and share Kubernetes manifests as charts.
- Templating engine: write a manifest once and fill in the values that differ.
- Release management: keep a history of installs and upgrades so you can roll back.
What is a Helm chart?
A Helm chart is a bundle of Kubernetes YAML files (as templates) together with metadata and default configuration, packaged so that anyone can install it into their cluster. It is the “package” in “package manager”.
Let me make this concrete. Say you have deployed your application in a Kubernetes cluster and now you want to add Elasticsearch so your application can store its logs. To run Elasticsearch in Kubernetes you need several components:
- a StatefulSet, because it is a stateful application like a database
- a ConfigMap with external configuration
- a Secret with credentials
- a ServiceAccount with the right permissions (RBAC)
- a couple of Services
If you had to write all of those files yourself, searching for each one separately, getting them working together and testing them would take quite some time. And since an Elasticsearch deployment looks pretty much the same in every cluster, lots of other people would be doing the exact same work.
So it makes perfect sense that someone writes those YAML files once, packages them up and makes them available, so everyone else can reuse them. That bundle is a Helm chart. Common software with a complex setup, like databases (MongoDB, MySQL, PostgreSQL), Elasticsearch or monitoring tools like Prometheus, all have charts available, and often the chart is maintained by the company or project that builds the software itself. This easy sharing of charts is one of the main reasons Helm became so popular.
Finding and installing an existing chart
Here is the full flow with a real, public chart, the Prometheus community chart:
# Add a chart repository and refresh the local index
helm repo add prometheus-community https://prometheus-community.github.io/helm-charts
helm repo update

# Search the repositories you added, or search Artifact Hub
helm search repo prometheus
helm search hub prometheus

# Look at the configurable values before installing
helm show values prometheus-community/prometheus > prometheus-values.yaml

# Install the chart as a release named "monitoring" in its own namespace
helm install monitoring prometheus-community/prometheus \
  --namespace monitoring --create-namespace
In the video I mention Helm Hub and the helm/charts GitHub repository. Both are retired today: public charts are listed on Artifact Hub, and each project hosts its own chart repository. Many charts are also published to OCI registries (the same kind of registry that stores Docker images), which you install directly with an oci:// reference, for example helm install my-release oci://registry.example.com/charts/my-chart --version 1.2.0.
Apart from public charts, companies also create charts for their own applications and share them only internally. For that they use private chart repositories, or simply push charts to their private container registry as OCI artifacts.
How does Helm templating work?
Helm’s second feature is that it is a templating engine: you write one blueprint YAML file with placeholders for the values that change, and Helm fills in those placeholders from a values file when it renders the chart.
Imagine an application made of many microservices. The Deployment and Service for each microservice are almost identical; only a few values differ, like the application name, the Docker image and its tag, or the port. Without Helm you would maintain a separate Deployment and Service file for every microservice, each one a near copy of the others.
With Helm you define one common template and replace the dynamic parts with placeholders. Here is a minimal templates/deployment.yaml:
apiVersion: apps/v1
kind: Deployment
metadata:
  name: {{ .Values.appName }}
  labels:
    app: {{ .Values.appName }}
spec:
  replicas: {{ .Values.replicaCount }}
  selector:
    matchLabels:
      app: {{ .Values.appName }}
  template:
    metadata:
      labels:
        app: {{ .Values.appName }}
    spec:
      containers:
        - name: {{ .Values.appName }}
          image: "{{ .Values.image.repository }}:{{ .Values.image.tag }}"
          ports:
            - containerPort: {{ .Values.containerPort }}
It is standard Kubernetes YAML, but wherever a value is dynamic you see the {{ .Values.something }} syntax. That means: take this value from external configuration. The external configuration comes from a file called values.yaml:
appName: payment-service
replicaCount: 2
image:
  repository: my-registry.example.com/payment-service
  tag: "1.0.0"
containerPort: 8080
.Values is an object that Helm builds from all the values you supply: the chart’s values.yaml, any extra values files you pass with -f, and individual values passed with --set. Your templates then read from that object. Now instead of one YAML file per microservice you have one template, and each microservice just gets its own small values file.
This is especially practical in CI/CD pipelines: the pipeline builds a new image, then runs helm upgrade with the new image tag, and Helm fills it into the template on the fly before deploying.
Besides .Values, templates can use a few other built-in objects, for example .Release.Name (the release name you chose at install time) and .Chart.Version (from Chart.yaml). Helm templates are Go templates, so you also get functions like default and quote, for example {{ .Values.image.tag | default .Chart.AppVersion }}.
Helm use cases: when should you use Helm?
Helm is most useful when you would otherwise copy, paste and edit the same YAML again and again. These are the typical cases:
- Installing third-party software. Databases, message brokers, monitoring and logging stacks have charts maintained by people who know the software well. You install and configure them through values instead of writing the manifests yourself.
- Many similar microservices. One chart (or a shared base chart) with a values file per service, as in the templating example above.
- The same application in several environments. Package your application as a chart once and deploy it to development, staging and production clusters, each with its own values file (different replica counts, resource limits or hostnames). One command per environment, and every environment runs the same templates.
- CI/CD deployments. Pipelines call
helm upgrade --installwith a new image tag, and you get release history and rollbacks for free.
Here is how Helm compares to applying plain manifests with kubectl:
kubectl apply -f | Helm | |
|---|---|---|
| What you deploy | Static YAML files | A chart: templates plus values |
| Per-environment config | Copies of files (or a separate tool like Kustomize) | One values file per environment |
| Reusing third-party apps | Find and adapt the YAML yourself | helm install a maintained chart |
| Upgrades | Re-apply the changed files | helm upgrade creates a new revision |
| Rollback | Manual (or kubectl rollout undo per Deployment) | helm rollback restores a whole release |
| Seeing what is installed | List resources one by one | helm list and helm history |
| Best for | A few simple, stable manifests | Reusable, configurable, multi-environment apps |
Free download
Not sure what to learn after Helm?
Helm sits on top of Kubernetes and is usually driven by a CI/CD pipeline or a GitOps tool. The roadmap shows how these pieces fit together and in which order to learn them.
Helm chart structure explained
A Helm chart is a directory: the top-level folder is the chart’s name, and inside it you have Chart.yaml (metadata), values.yaml (default values), a charts/ folder for dependencies and a templates/ folder for the template files.
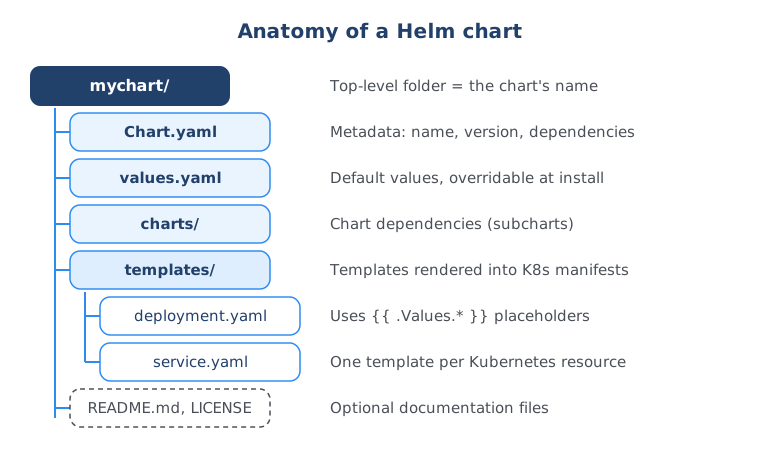
mychart/
├── Chart.yaml        # chart metadata: name, version, dependencies
├── values.yaml       # default values for the templates
├── charts/           # charts this chart depends on (subcharts)
├── templates/        # template files that become Kubernetes manifests
│   ├── deployment.yaml
│   └── service.yaml
└── README.md # optional, like LICENSEChart.yamlholds the meta information about the chart: its name, version, description and, if needed, a list of dependencies.values.yamlis where all the values for the templates are configured. These are the defaults, which you can override later.charts/contains chart dependencies. If this chart depends on other charts, they end up here (Helm downloads them when you runhelm dependency update).templates/is where the template files live. When you runhelm install, Helm fills these templates with the values and produces valid Kubernetes manifests, which it then deploys.
Here is a valid Chart.yaml for Helm 3:
apiVersion: v2
name: mychart
description: A Helm chart for my microservice
type: application
version: 0.1.0        # version of the chart itself
appVersion: "1.0.0"   # version of the application it deploys
apiVersion: v2 is the chart format for Helm 3. Dependencies are listed directly in Chart.yaml under a dependencies: key; in Helm 2 they lived in a separate requirements.yaml file.
And a matching templates/service.yaml that reuses the same values:
apiVersion: v1
kind: Service
metadata:
  name: {{ .Values.appName }}
spec:
  selector:
    app: {{ .Values.appName }}
  ports:
    - protocol: TCP
      port: 80
      targetPort: {{ .Values.containerPort }}
You do not have to create this structure by hand. helm create mychart scaffolds a complete chart with this layout plus a few extras (such as _helpers.tpl for reusable template snippets and a .helmignore file), which you can then trim down to what you need.
How values.yaml is overridden: -f and —set
The chart’s values.yaml only provides defaults. You override them at install or upgrade time either with your own values file (-f or --values) or with individual values on the command line (--set), and Helm merges everything into the single .Values object.
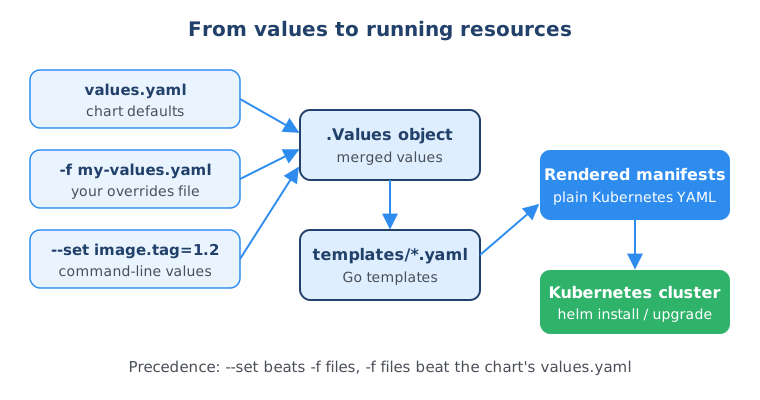
Say the chart’s values.yaml has these three values:
image:
  repository: my-registry.example.com/payment-service
  tag: "1.0.0"
containerPort: 8080
You create your own file, my-values.yaml, that overrides only the tag:
image:
  tag: "1.1.0"
Then install with it:
helm install payment ./mychart -f my-values.yamlHelm merges the two files. The resulting .Values object has the repository and port from the chart’s values.yaml and the tag from your file:
image:
  repository: my-registry.example.com/payment-service
  tag: "1.1.0"
containerPort: 8080
You can also add new keys in your own file; they are merged in the same way. Alternatively you set individual values directly on the command line:
helm install payment ./mychart --set image.tag=1.1.0The rule for precedence is: --set beats -f files, and a later -f file beats an earlier one, which all beat the chart’s own values.yaml. In practice, prefer values files. They are more organized, easier to review and can live in Git, while long --set lists on the command line are easy to get wrong and hard to reproduce.
Core Helm commands you need
These commands cover most daily Helm work. All of them are valid in Helm 3 and later:
# Repositories
helm repo add prometheus-community https://prometheus-community.github.io/helm-charts
helm repo update

# Render templates locally and print the YAML (nothing is deployed)
helm template payment ./mychart -f values-prod.yaml

# Check a chart for problems
helm lint ./mychart

# Install a chart as a new release
helm install payment ./mychart -f values-prod.yaml --namespace payments --create-namespace

# Upgrade the release with new values or a new chart version
helm upgrade payment ./mychart -f values-prod.yaml --set image.tag=1.2.0 --namespace payments

# Install if missing, upgrade if it exists (typical in CI/CD)
helm upgrade --install payment ./mychart -f values-prod.yaml --namespace payments

# List releases (current namespace, or all namespaces with -A)
helm list
helm list -A

# Show the revision history and roll back to revision 1
helm history payment --namespace payments
helm rollback payment 1 --namespace payments

# Remove the release and the resources it created
helm uninstall payment --namespace payments
helm template is the one I recommend getting used to early. It shows you the exact Kubernetes YAML your values produce, which is the fastest way to debug a template. You can also run helm install or helm upgrade with --dry-run --debug to render against the cluster without changing anything.
In the DevOps Bootcamp you write your own charts like this and deploy them to a real cluster as part of a complete project.
Helm release management: Helm 3 vs Helm 2 and Tiller
A release is one installed instance of a chart. Every helm install, helm upgrade or helm rollback creates a new numbered revision of that release, and Helm 3 stores each revision as a Kubernetes Secret in the release’s namespace. That history is what makes upgrades and rollbacks work.
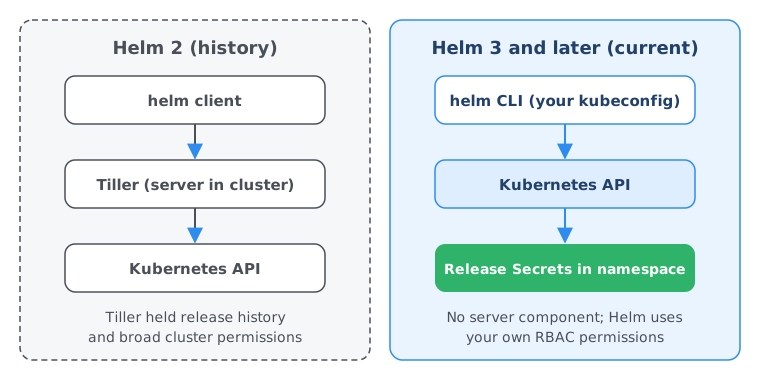
When you run helm upgrade, Helm applies the changes to the existing resources instead of deleting and recreating them. If an upgrade goes wrong, for example because of a bad value or a broken image, helm rollback payment 1 brings the whole release (every resource in the chart) back to revision 1.
You can see the stored history directly:
kubectl get secrets -n payments -l owner=helmThe Secrets are named like sh.helm.release.v1.payment.v1, sh.helm.release.v1.payment.v2 and so on, one per revision. Because they live in the release’s namespace, access to releases is controlled by normal Kubernetes RBAC: you can only install or upgrade what your own credentials allow.
A short history note on Tiller. In the video I explain the Helm 2 architecture, because back then it mattered. Helm 2 had two parts: the helm client and a server component called Tiller that ran inside the cluster. The client sent the chart to Tiller, Tiller created the resources and kept the release history. The big problem was that Tiller usually had very broad permissions in the cluster (it could create, update and delete almost anything), which made it a serious security risk. Helm 3 removed Tiller completely. Today Helm is a single binary that talks to the Kubernetes API with your kubeconfig, and, unlike what I said in the video at the time, release management was not lost: history, upgrades and rollbacks all still work, with the history stored as Secrets as shown above. If you read about Tiller in an old tutorial, you can ignore that part.
Downsides of Helm
Helm is not free of trade-offs, and it is worth knowing them before you put everything into charts:
- Templates can become hard to read. YAML with Go template logic, conditionals and loops is harder to review than plain YAML. Keep templates simple and lean on
helm templateto see the output. - Another layer to debug. When something fails, you first need to find out whether it is a template, a value or a Kubernetes problem.
- Third-party charts hide complexity. Installing a database chart is one command, but you are still responsible for understanding the values you set, especially storage, security settings and upgrades between chart versions.
- Not always necessary. For a handful of static manifests, plain
kubectl applyor Kustomize can be simpler.
For most teams the benefits win once they deploy several services or several environments, which is why Helm is a standard tool in Kubernetes projects.
Summary
Helm is the package manager for Kubernetes: a Helm chart bundles all the YAML templates an application needs, values.yaml and override files fill in the placeholders, and Helm tracks every install and upgrade as a release so you can roll back. Helm 3 and later have no Tiller; the CLI talks to the Kubernetes API directly and stores release history as Secrets. A good next step is to run helm create, change a few values, and compare the output of helm template before installing. To understand the Services your charts create, read Kubernetes Services explained; to deploy charts automatically, continue with the GitHub Actions tutorial or the GitOps approach in the Argo CD tutorial.
Frequently asked questions
What is Helm in Kubernetes in simple terms?
Helm is a package manager for Kubernetes. Instead of writing and applying many separate YAML files for an application, you install one Helm chart that contains all of them, configured through a single values file. Helm then keeps track of what it installed so you can upgrade or roll back later.
What is the difference between a Helm chart and a Helm release?
A Helm chart is the package: the templates, Chart.yaml and default values. A release is a running instance of that chart in a cluster, created with helm install and given its own name. You can install the same chart several times as separate releases, for example one per team or environment.
What is values.yaml in Helm?
values.yaml is the file in a chart that holds the default configuration values used by the templates, such as the image name, tag, replica count or service port. Templates read them through the .Values object. You can override the defaults with your own file using -f or with individual --set flags.
Does Helm 3 still use Tiller?
No. Tiller was the in-cluster server component of Helm 2 and was removed in Helm 3 because it had broad permissions and was a security concern. Helm 3 is a single client binary that talks to the Kubernetes API directly with your own credentials and stores release history as Secrets in the release's namespace.
Should I use Helm or kubectl apply?
kubectl apply is enough for a few static manifests. Helm is the better fit when you deploy third-party software like Prometheus or databases, deploy many similar services, or deploy the same application to several environments with different settings. Helm also gives you release history and one-command rollbacks, which plain kubectl does not.
How do I see the YAML that a Helm chart generates?
Run helm template with a release name and the chart, for example helm template my-app ./mychart -f values-prod.yaml. It renders the templates with your values and prints the resulting Kubernetes manifests without touching the cluster. For an already installed release, helm get manifest shows what was deployed.
Where can I find Helm charts?
Most public charts are listed on Artifact Hub, which you can also search from the command line with helm search hub. Many projects publish their own chart repository or an OCI registry location in their documentation. Companies often host private chart repositories or use their container registry to share internal charts.