
Jenkins Pipeline Tutorial: How to Write a Jenkinsfile, Step by Step
Quick answer
A Jenkins pipeline is a build defined as code in a file called Jenkinsfile, which lives in your Git repository next to your application code. In the declarative syntax, a Jenkinsfile is a pipeline block with an agent and a list of stages, where each stage has steps that run your build, test and deploy commands. On top of that you add post actions, when conditions, environment variables, credentials, tools and parameters to control how and when each stage runs.
Video chapters (10)
- 0:00 Intro
- 0:11 What is a Jenkinsfile?
- 0:50 From scripted to declarative pipeline syntax
- 2:48 Basic structure of a Jenkinsfile
- 8:40 Post build actions
- 10:15 Conditionals with when expressions
- 12:45 Environment variables in a Jenkinsfile
- 20:13 Making build tools available with tools
- 22:30 Parameters for a parameterized build
- 27:29 Using external Groovy scripts
Key takeaways
- A Jenkinsfile is pipeline as code: the build configuration lives in your repository instead of in the Jenkins UI.
- Declarative syntax (pipeline, agent, stages, stage, steps) is the recommended starting point; scripted syntax (node) is plain Groovy and more flexible.
- The post block runs after all stages, with conditions like always, success and failure.
- A when block skips a stage unless a condition is true, for example the branch is dev or a parameter is checked.
- Jenkins lists all built-in environment variables at <your-jenkins-url>/env-vars.html; define your own in an environment block.
- Use credentials() or withCredentials to read secrets from Jenkins, and keep them out of double-quoted Groovy strings.
- Move Groovy logic into a separate file, load it with load, and test changes with the Replay button.
In this guide I show you what a Jenkinsfile is, how to create one and what its syntax looks like, from the most basic pipeline to environment variables, credentials, parameters and external Groovy scripts. It is for anyone who has clicked through Jenkins jobs in the UI and now wants to define builds as code. Every example is valid declarative pipeline syntax you can copy into your own repository.
What is a Jenkinsfile?
A Jenkinsfile is a text file in your Git repository that defines your Jenkins build as code. Instead of creating and configuring a job in the Jenkins user interface, you write the build and its configuration in this file, and Jenkins reads it from the branch it builds.
This is called pipeline as code, part of the bigger infrastructure as code idea. The pipeline lives next to the application code, so it is versioned, reviewed and changed together with the code it builds.
To get started, you create a file called Jenkinsfile (capital J, no extension) in the root of your repository. In my demo I create it on the dev branch of a small JavaScript project.
Declarative vs scripted pipeline
A Jenkinsfile can be written in two syntaxes: scripted pipeline, which is plain Groovy inside a node block, and declarative pipeline, which has a predefined structure of pipeline, agent, stages and steps. Declarative is newer, easier to start with and what I recommend for most projects.
Scripted pipeline was the first syntax. The only structure you get is the node block, and inside it you write Groovy however you want:
node {
    stage('Build') {
        echo 'Building the application...'
    }
}
That is very flexible, but hard to start with if you have never worked with Groovy. That’s why Jenkins added the declarative syntax: you follow a given structure and fill in the gaps. It is less powerful on its own, but you can still drop into Groovy with a script block, which I show at the end of this guide.
| Declarative pipeline | Scripted pipeline | |
|---|---|---|
| Starts with | pipeline { } | node { } |
| Structure | Fixed: agent, stages, stage, steps, post | None, you write Groovy freely |
| Learning curve | Easy, readable for non-Groovy users | Needs Groovy knowledge |
| Validation | Syntax checked before the build runs | Errors show up while it runs |
| Built-in features | when, post, environment, parameters, tools, options | Implemented by hand with Groovy |
| Custom logic | Inside script { } blocks | Anywhere |
| Best for | Most CI/CD pipelines | Very dynamic or unusual pipelines |
The node line in a scripted pipeline roughly corresponds to two lines in declarative syntax: pipeline declares that you are writing a pipeline, and agent any says where it runs.
Basic Jenkinsfile structure: pipeline, agent, stages and steps
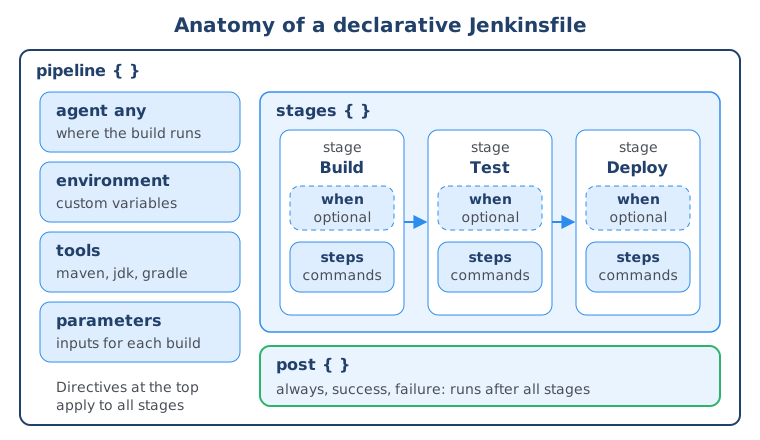
Every declarative Jenkinsfile needs four things: a pipeline block, an agent that says where the build runs, a stages block, and at least one stage with steps inside. Here is the minimal working Jenkinsfile from the demo:
pipeline {
    agent any

    stages {
        stage('Build') {
            steps {
                echo 'Building the application...'
            }
        }
        stage('Test') {
            steps {
                echo 'Testing the application...'
            }
        }
        stage('Deploy') {
            steps {
                echo 'Deploying the application...'
            }
        }
    }
}
agent any means the build runs on any available Jenkins agent. This matters once you have a Jenkins cluster with a controller and several agents, for example Linux and Windows machines, and you want a build to run on a specific kind of node. For the beginning, agent any is all you need. (In the video I say “master and slaves”; Jenkins today calls them the controller and agents.)
stages is where the actual work happens. You can define as many stages as you want, typically build, test and deploy. Inside each stage, steps holds the commands that run on the agent. For a JavaScript app that would be sh 'npm install' and sh 'npm run build'; for a Java backend it could be sh 'mvn test'. To keep the focus on syntax, I just use echo for now.
Connect the Jenkinsfile to a Multibranch Pipeline
Once the Jenkinsfile is committed, you create a job in Jenkins that uses it:
- In Jenkins, click New Item, name it (I call mine
my-app-pipeline) and select Multibranch Pipeline. - Under Branch Sources, add your Git repository and select the credentials Jenkins should use to access it.
- Leave Build Configuration on the default: mode “by Jenkinsfile” with Script Path
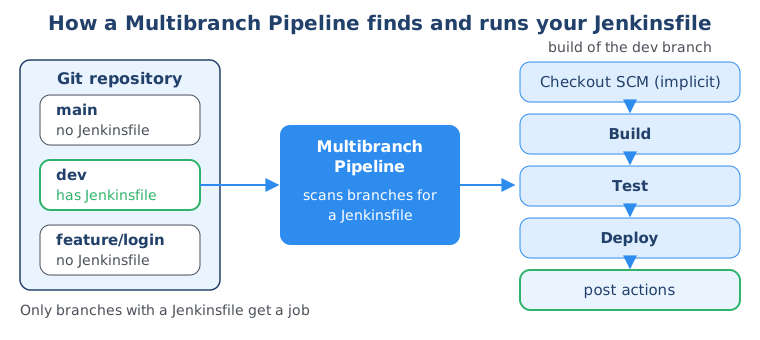
Jenkinsfile. That is the file name and its path relative to the repository root. Change it only if your file lives somewhere else. - Save. Jenkins scans all branches, creates a job for every branch that contains a Jenkinsfile and builds it.
In my demo Jenkins scans master, dev and a few test branches, but only builds dev, the only branch with a Jenkinsfile. The build view shows the stages Build, Test and Deploy with their echo output, plus a first stage, Declarative: Checkout SCM, that Jenkins adds automatically to check out the code.
From now on, all configuration of the individual steps happens in the Jenkinsfile itself.
How to use post actions and when conditions in a Jenkinsfile
The post block runs logic after all stages are done, and when decides whether a single stage runs at all. Together they control what happens depending on build status, branch or input.
Post actions: always, success, failure
Add a post block at the end of the pipeline, after stages. Inside it you choose a condition, and the steps in that condition run when it matches:
pipeline {
    agent any
    stages {
        // your stages
    }
    post {
        always {
            echo 'Runs no matter how the build ended, e.g. send an email to the team'
        }
        success {
            echo 'Runs only if the build succeeded'
        }
        failure {
            echo 'Runs only if the build failed'
        }
    }
}
always is a good place for notifications, because you want to know the result whether the build failed or succeeded. In general, post conditions are based either on the build status or on a change of build status. Besides the three above, Jenkins supports unstable, aborted, changed (status differs from the previous build), fixed (previous build failed, this one succeeded), regression, unsuccessful and cleanup (always runs last).
When conditions: run a stage only on certain branches
A when block inside a stage tells Jenkins when that stage should execute. If the condition is false, Jenkins skips the stage and shows it as skipped. Say you only want to run tests for builds of the dev branch, not for feature branches:
stage('Test') {
    when {
        expression {
            env.BRANCH_NAME == 'dev'
        }
    }
    steps {
        echo 'Testing the application...'
    }
}
BRANCH_NAME is an environment variable that Jenkins provides out of the box in multibranch pipelines. You can write it as env.BRANCH_NAME or just BRANCH_NAME. Like a normal if, an expression can combine conditions with || (or) and && (and), for example env.BRANCH_NAME == 'dev' || env.BRANCH_NAME == 'main'. Declarative pipeline also has built-in conditions that read more cleanly for common cases:
when {
    anyOf {
        branch 'dev'
        branch 'main'
    }
}
Another use case from the video: only build the application if the code actually changed. You would compute a boolean yourself, for example with a Groovy function that inspects the Git changes, and check it together with the branch. getGitChanges() below is a placeholder for your own logic, not a built-in step:
def CODE_CHANGES = getGitChanges()   // your own Groovy function, defined above the pipeline block

// inside stage('Build')
when {
    expression {
        env.BRANCH_NAME == 'dev' && CODE_CHANGES == true
    }
}
Jenkins environment variables in a Jenkinsfile
Jenkins gives you built-in environment variables like BRANCH_NAME and BUILD_NUMBER, and you can define your own in an environment block. Both are available in every stage of the pipeline.
To see all built-in variables, open <your-jenkins-url>/env-vars.html, for example http://localhost:8080/env-vars.html. That page lists each variable with a description. I find it the most practical reference, for example when you want BUILD_NUMBER for versioning your artifact.
To define your own, add an environment block at the top of the pipeline. A common example is a version you need in several stages. Usually you would extract it from your code, but here I just hardcode it:
pipeline {
    agent any
    environment {
        NEW_VERSION = '1.3.0'
    }
    stages {
        stage('Build') {
            steps {
                echo "Building version ${NEW_VERSION}"
                echo "This is build number ${env.BUILD_NUMBER}"
            }
        }
    }
}
An important Groovy detail: variables are only interpolated in double quotes. "Building version ${NEW_VERSION}" prints Building version 1.3.0, while 'Building version ${NEW_VERSION}' prints the text literally. For plain strings without variables, either quote style works.
You can also define an environment block inside a single stage. Those variables exist only in that stage.
Free download
Not sure what to learn after Jenkins pipelines?
A Jenkinsfile is the CI part of the picture. The roadmap shows how it connects to Docker, Kubernetes, cloud, infrastructure as code and monitoring, and in which order to learn them.
How to use Jenkins credentials in a pipeline
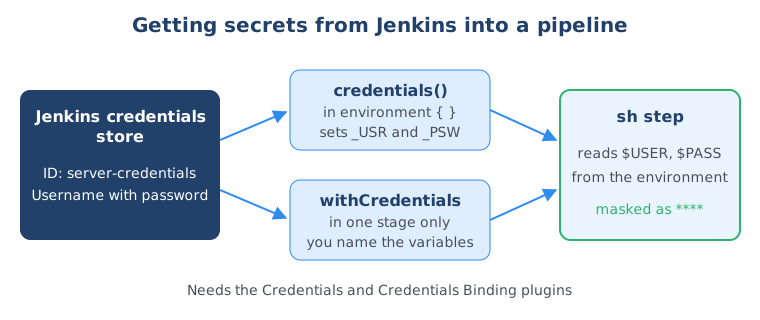
To use a secret in a Jenkinsfile, you first store it in Jenkins as a credential with an ID, then read it in the pipeline either with the credentials() helper in an environment block or with the withCredentials step inside one stage. Both need the Credentials plugin (to create credentials in the UI) and the Credentials Binding plugin (to use them in a Jenkinsfile).
Say a deploy stage copies the new artifact to a development server and needs its username and password. First create the credential:
- Go to Manage Jenkins > Credentials, choose the global domain and click Add Credentials.
- Select the kind Username with password, fill in the username and password.
- Set the ID to
server-credentials. This is the reference you use in the Jenkinsfile.
Option 1: credentials() in the environment block
pipeline {
    agent any
    environment {
        SERVER_CREDENTIALS = credentials('server-credentials')
    }
    stages {
        stage('Deploy') {
            steps {
                sh 'echo "Deploying as $SERVER_CREDENTIALS_USR"'
                sh './deploy.sh "$SERVER_CREDENTIALS_USR" "$SERVER_CREDENTIALS_PSW"'
            }
        }
    }
}
For a username-with-password credential, credentials() sets three variables: SERVER_CREDENTIALS contains username:password, SERVER_CREDENTIALS_USR the username and SERVER_CREDENTIALS_PSW the password. For a secret text credential, you just get the one variable.
Option 2: withCredentials in a single stage
If you only need the secret in one stage, it makes sense to read it there. withCredentials is a wrapper: the variables exist only inside its block.
stage('Deploy') {
    steps {
        withCredentials([
            usernamePassword(credentialsId: 'server-credentials',
                             usernameVariable: 'USER',
                             passwordVariable: 'PASS')
        ]) {
            sh 'scp target/app.jar "$USER@dev-server:/opt/app/"'
            sh './deploy.sh "$USER" "$PASS"'
        }
    }
}
You can use usernamePassword here because the credential is of type username and password. Other types have their own binding, for example string(credentialsId: '...', variable: 'TOKEN') for secret text and sshUserPrivateKey(...) for SSH keys. Jenkins masks the values in the console log.
In the video I write the secrets into double-quoted Groovy strings like "some script ${USER} ${PWD}". Today, don’t do that. Jenkins warns about insecure interpolation of sensitive variables, because Groovy puts the secret into the command string before the shell sees it, which can leak it into process listings and logs. Use single quotes around the sh command so the shell reads $USER and $PASS from the environment instead. Also avoid PWD as a variable name, since the shell already uses it for the current directory.
Tools and parameters in a Jenkinsfile
The tools directive makes build tools like Maven, Gradle or a JDK available in your stages, and the parameters directive lets the person starting a build provide input, such as which version to deploy. Both go at the top of the pipeline, next to environment.
The tools directive
If you build a Java backend, you need Maven or Gradle installed for commands like mvn install or gradle build. The tools directive puts them on the PATH for the whole pipeline:
pipeline {
    agent any
    tools {
        maven 'Maven'
    }
    stages {
        stage('Build') {
            steps {
                sh 'mvn --version'
                sh 'mvn install'
            }
        }
    }
}
Declarative pipeline supports maven, jdk and gradle out of the box; some plugins, such as the NodeJS plugin, add their own tool types. The string after the tool type, here 'Maven', is not a version. It is the name of an installation you configured in Jenkins. You set that up under Manage Jenkins > Tools (called Global Tool Configuration in the video), where you add a Maven installation, give it a name and let Jenkins install it automatically. The name in the Jenkinsfile must match exactly. Other tools you install on the agent or get from a Docker image.
Parameters for a parameterized build
Parameters are external input that changes a build’s behavior. Say a build deploys your application to a staging server and you want to choose which version to deploy:
pipeline {
    agent any
    parameters {
        choice(name: 'VERSION', choices: ['1.1.0', '1.2.0', '1.3.0'], description: 'Version to deploy on prod')
        booleanParam(name: 'executeTests', defaultValue: true, description: 'Run the test stage')
    }
    stages {
        stage('Test') {
            when {
                expression {
                    params.executeTests
                }
            }
            steps {
                echo 'Testing the application...'
            }
        }
        stage('Deploy') {
            steps {
                echo "Deploying version ${params.VERSION}"
            }
        }
    }
}
string(name: 'VERSION', defaultValue: '', description: '...')lets the user type any value.choicegives a dropdown of predefined values, so nobody has to type a version by hand. The first choice is the default.booleanParamis a checkbox, useful for skipping a stage on some builds.
You read parameters with params.NAME. The when expression is a natural fit: params.executeTests alone is enough, params.executeTests == true works too. Parameter names are case-sensitive, so use the same spelling everywhere; whether you choose all caps or camelCase is up to you.
After you commit this, open the branch job in Jenkins. Once Jenkins has run the new Jenkinsfile once, the Build Now button changes to Build with Parameters. In my demo I select version 1.2.0, uncheck executeTests and run it: the Test stage is skipped and the Deploy stage prints “Deploying version 1.2.0”. The parameters apply to all branches of the multibranch job.
How to use an external Groovy script in a Jenkinsfile
You can move Groovy logic out of the Jenkinsfile into a separate .groovy file in your repository, load it with the load step, and call its functions from your stages. This keeps the Jenkinsfile short and readable when stages grow complex.
So far I used simple echo commands, but a Jenkinsfile supports Groovy. In declarative syntax you write it in a script block inside steps, where you can define variables, call functions and use if statements. In real projects, building the frontend and backend, running tests and building and pushing a Docker image quickly fill the Jenkinsfile with scripts, so extracting them is good practice.
First create script.groovy in the repository root:
def buildApp() {
    echo 'Building the application...'
}

def testApp() {
    echo 'Testing the application...'
}

def deployApp() {
    echo "Deploying version ${params.VERSION}"
}

return this
The return this at the end is important. load returns whatever the script returns, and without it you can’t call the functions from the Jenkinsfile. Notice that deployApp uses params.VERSION: all parameters, environment variables and built-in Jenkins variables are available inside the loaded script without any extra configuration.
Then load the script in an init stage and call its functions. Each call goes inside a script block, because it is Groovy code and not a declarative step:
def gv

pipeline {
    agent any
    parameters {
        choice(name: 'VERSION', choices: ['1.1.0', '1.2.0', '1.3.0'], description: 'Version to deploy on prod')
        booleanParam(name: 'executeTests', defaultValue: true, description: 'Run the test stage')
    }
    stages {
        stage('Init') {
            steps {
                script {
                    gv = load 'script.groovy'
                }
            }
        }
        stage('Build') {
            steps {
                script {
                    gv.buildApp()
                }
            }
        }
        stage('Test') {
            when {
                expression { params.executeTests }
            }
            steps {
                script {
                    gv.testApp()
                }
            }
        }
        stage('Deploy') {
            steps {
                script {
                    gv.deployApp()
                }
            }
        }
    }
}
gv is defined outside the pipeline block so it is available in every stage. Now, when the logic of building the application changes, for example you start reading the version from your pom.xml or Gradle file, that logic lives in the Groovy script and the Jenkinsfile keeps its slim structure. You can extract Groovy used in when expressions the same way. When the same functions are needed across many repositories, the next step is a Jenkins shared library.
Test changes with Replay
Open any finished build of a branch and click Replay. Jenkins shows the Jenkinsfile and every loaded script, such as script.groovy, in editable boxes, so you can change them and rerun the build without committing. Once the change works, commit it.
In the DevOps Bootcamp you build a complete Jenkins pipeline end to end, from versioning and building a Docker image to deploying it to a server.
Summary
A Jenkinsfile defines your Jenkins pipeline as code in your repository, and the declarative syntax gives it a clear structure: pipeline, agent, stages and steps, plus post for actions after the build and when for conditional stages. Use the environment block and /env-vars.html for variables, credentials() or withCredentials for secrets in single-quoted shell commands, tools and parameters for build tools and user input, and load to keep Groovy logic in a separate file. If you want to compare this with a hosted CI tool, read the GitHub Actions tutorial. To continue from CI into deployment, see how GitOps works in the Argo CD tutorial and how your deployed app is reached in Kubernetes Services explained.
Frequently asked questions
What is the difference between a Jenkinsfile and a Jenkins pipeline?
A Jenkins pipeline is the automated sequence of stages Jenkins runs to build, test and deploy your application. A Jenkinsfile is the text file in your repository that defines that pipeline as code. Jenkins reads the Jenkinsfile from the branch it builds and runs the stages described in it.
Should I use declarative or scripted pipeline syntax?
Start with declarative syntax. It has a fixed structure that is easier to read, it validates your file before running it, and it covers most real pipelines. When you need logic that declarative directives can't express, add a script block inside a step instead of switching the whole file to scripted syntax.
Where can I see all Jenkins environment variables?
Open your Jenkins URL followed by /env-vars.html, for example http://localhost:8080/env-vars.html. That page lists every built-in variable, such as BUILD_NUMBER, BRANCH_NAME and JOB_NAME, with a short description. You can read them in a Jenkinsfile as env.BUILD_NUMBER or as BUILD_NUMBER inside double-quoted strings.
How do I use credentials in a Jenkinsfile?
First create the credential in Jenkins under Manage Jenkins, Credentials, and give it an ID. Then read it in the Jenkinsfile either with credentials('your-id') inside the environment block or with the withCredentials step inside a single stage. Pass the secret to shell commands through environment variables in single-quoted strings so Groovy does not interpolate it.
How do I skip a stage in a Jenkins pipeline?
Add a when block to the stage. Jenkins evaluates the condition before the stage starts and skips the stage if it is false. Common conditions are branch 'main', expression { params.executeTests }, and combinations with anyOf or allOf.
Why don't I see Build with Parameters after adding parameters to my Jenkinsfile?
Jenkins only learns about the parameters when it runs the Jenkinsfile, so the first build after adding them runs with the default values. After that build, the job shows Build with Parameters instead of Build Now. This also applies when you change or rename a parameter.
What does return this do in a Groovy script loaded by a Jenkinsfile?
The load step evaluates the Groovy file and returns whatever the file returns. Ending the file with return this returns the script object itself, so the Jenkinsfile can call its functions, for example gv.buildApp(). Without it, the functions in the file are not reachable from the pipeline.